
Irresistible Thai Coconut Ice Cream Sundae: Your New Favorite Dessert!
Whenever I think back to my childhood summers, the memory that comes to mind is one of me sitting in the backyard, a melt-in-your-mouth treat in hand, savoring every delectable bite of my mom’s homemade Thai Coconut Ice Cream Sundae. The creamy coconut ice cream swirled with sweet sticky rice, topped with crunchy roasted peanuts, was simply irresistible! Fast forward to today, and I still can’t get enough of this tantalizing treat. What makes the Thai Coconut Ice Cream Sundae truly special is not just its refreshingly creamy and lightly sweet flavor profile, but also the memories attached to it—family gatherings, laughter, and those perfect sunny afternoons.
What sets my recipe apart from others is the balance of flavors and textures I’ve perfected over the years, along with a few personal touches that I know you will love. You won’t just be making ice cream; you’ll be creating memories in your kitchen, just like I did in mine. By the end of this post, you’ll learn how to whip up a scrumptiously satisfying Thai Coconut Ice Cream Sundae that will have everyone begging for seconds!
What Are Thai Coconut Ice Cream Sundaes?
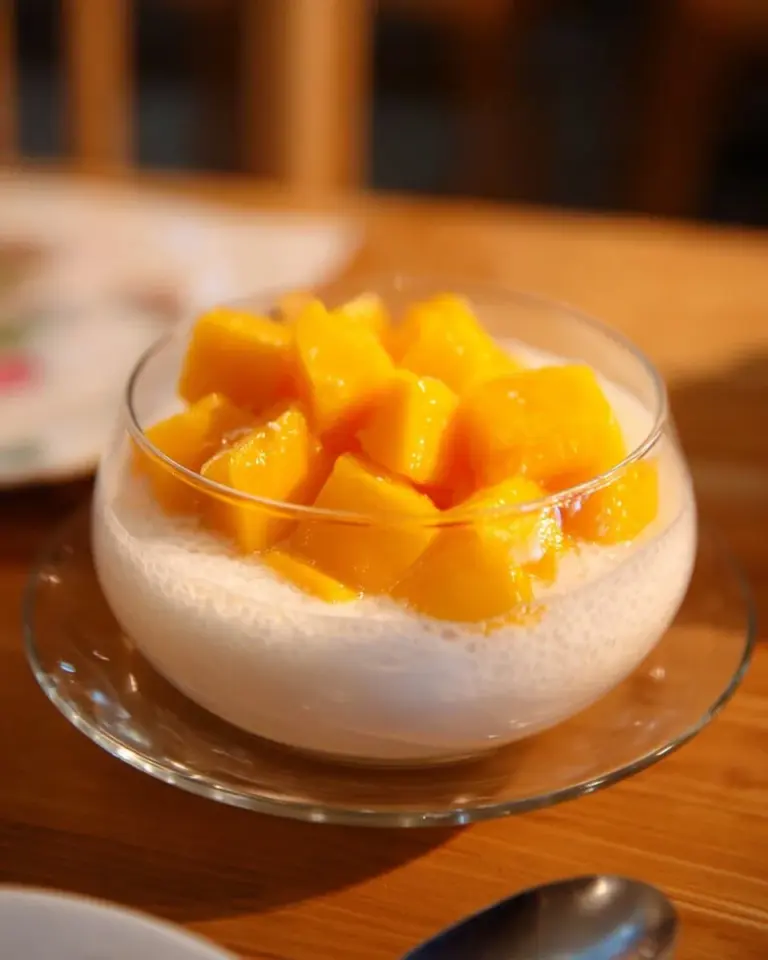
Originating from Thailand, the Thai Coconut Ice Cream Sundae is a delightful dessert that features rich coconut-based ice cream served over sticky rice, often topped with an assortment of goodies, including peanuts and sweet corn. Imagine a bowl filled with soft, fluffy rice that’s slightly sweet, all topped off with a luxuriously creamy, coconut-flavored ice cream that just melts in your mouth. The combination of sweet and savory, warm and cold, creates a unique harmony that excites the taste buds.
These sundaes are not just decadent treats; they’re also deeply rooted in Thai culture and tradition. A popular street food, they can often be found at dusk markets and seaside stalls, where vendors artfully assemble them for eager customers. Whether it’s a hot summer day or a festive family celebration, these sundaes are the perfect way to enjoy a taste of Thailand’s rich culinary heritage. So, whether you want to cool off on a scorching day or indulge as part of a special gathering, these sundaes are a delicious choice any time of the year!
Why You’ll Love This Recipe
-
Homemade Delight: You’re in control of the ingredients! This recipe allows you to craft your ice cream and sticky rice from scratch. You’ll notice the fresh, authentic flavors shine through, making it far superior to store-bought versions.
-
Cost-Effective: Making Thai Coconut Ice Cream Sundaes at home is not only fun but also wallet-friendly! While a visit to an upscale restaurant might set you back considerably, this homemade recipe is surprisingly budget-friendly.
-
Customization Options: You can easily tailor this sundae to suit your taste preferences or dietary needs. Swap different toppings like fruit or nuts, or even switch to a dairy-free milk for an alternative twist.
-
Simple Yet Impressive: Although it sounds extravagant, this recipe is quite manageable! With a little bit of time, you’ll learn techniques that are easy to master, turning you into a confident home chef.
-
Perfect for Bonding: This recipe is not just about the end product; it’s also a great opportunity to spend quality time with family and friends. Get everyone involved in making the sundae from start to finish—it’s as much fun as it is delicious!

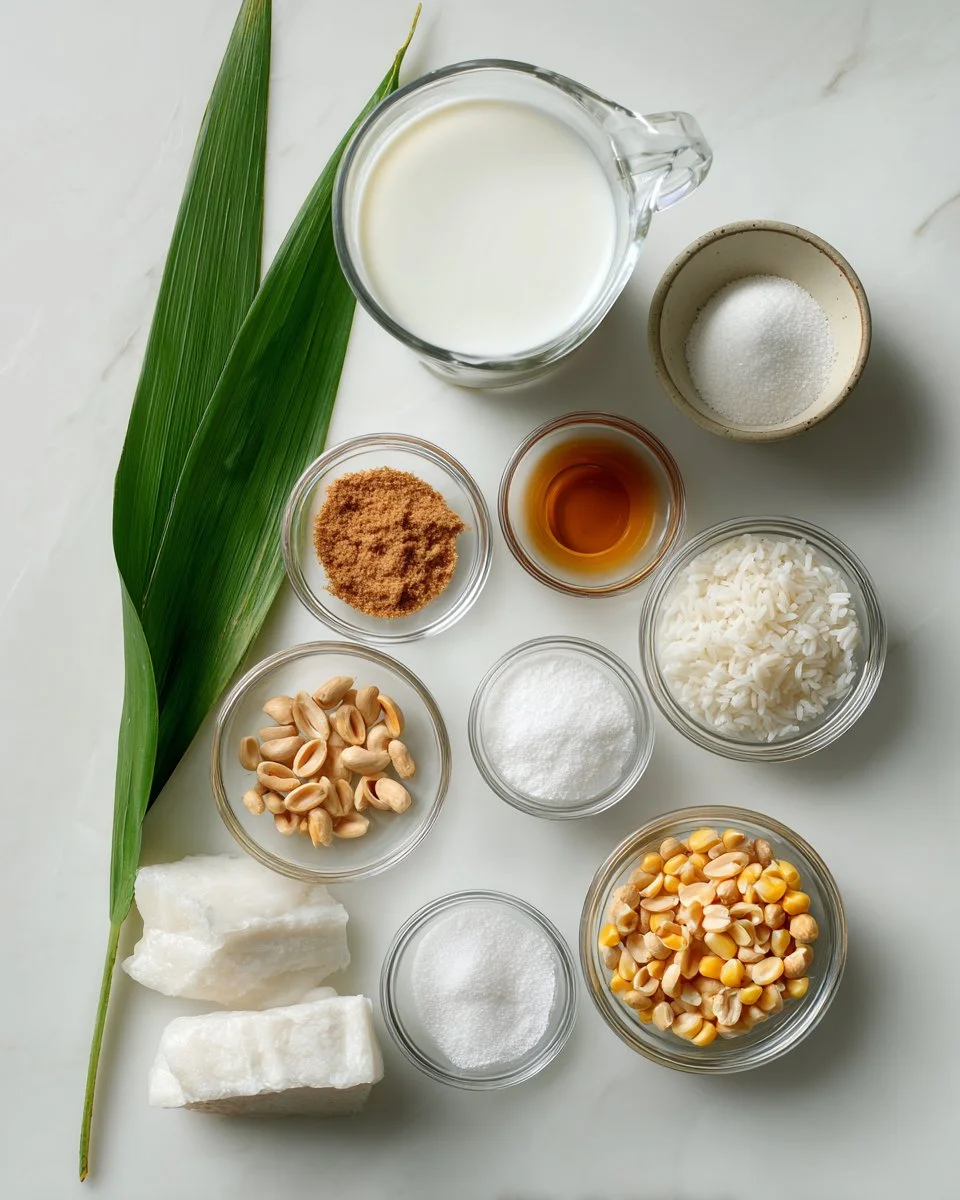
Ingredients
For the Coconut Ice Cream:
- 16.5 fl oz coconut milk: Use full-fat coconut milk for creaminess; brands like Thai Kitchen work great!
- 4 fl oz coconut water: For added flavor and hydration; if unavailable, you can substitute with more coconut milk.
- 4.2 oz chopped palm sugar: This gives a unique caramel-like sweetness; feel free to replace it with brown sugar if needed.
- 1/8 teaspoon table salt: Just a pinch enhances the flavors.
- Half a pandan leaf (optional): If you can find this, it adds a delicious aroma that can’t be beat.
For the Sticky Rice:
- 1 cup Thai glutinous rice: Make sure you get glutinous or sticky rice for that perfect chewy texture.
- 2/3 cup coconut milk (for sticky rice): Again, the full-fat version is best to achieve richness.
- 1/3 cup sugar (for sticky rice): White or brown sugar works.
- 1/2 teaspoon table salt (for sticky rice): It balances sweetness perfectly.
Optional Toppings:
- Freshly roasted peanuts: Great for crunch!
- Fluffy bun or dinner roll: A creative twist for serving.
- Sweet corn: Sweet kernels provide color and flavor.
Prep Notes: Make sure to soak the sticky rice for at least 4 hours before cooking. Ingredients like coconut milk should be at room temperature for easier blending.
Step-by-Step Instructions
For the Coconut Ice Cream:
-
Prepare the Ice Cream Base: In a pot, combine the coconut milk, coconut water, palm sugar, salt, and pandan leaf (if using). Heat over medium heat until it just starts to boil, stirring to dissolve the sugar.
-
Cool and Chill: Once boiled, remove from heat and allow it to cool. Then, chill it in the fridge for at least 2 hours or until thoroughly cold.
-
Churn: Pour the cooled mixture into your ice cream maker and churn according to the manufacturer’s instructions until it thickens (about 20-25 minutes).
-
Freeze: Transfer to an airtight container and freeze for at least 2 hours until firm.
For the Sticky Rice:
-
Pre-soak the Rice: Wash the Thai glutinous rice under cold water until the water runs clear. Soak it in enough water to cover for at least 4 hours or overnight for optimal results.
-
Steam the Rice: Drain and place the rice in a steamer basket lined with cheesecloth. Steam over boiling water for 20-25 minutes, or until it’s cooked through and sticky.
-
Make Coconut Syrup: In a small pot, combine coconut milk, sugar, and salt. Cook on low heat until sugar is dissolved but do not boil. Pour some of this syrup over your cooked rice and let it rest for about 10 minutes.
To Serve:
- Assemble your Sundae: Place a generous scoop of sticky rice in a bowl or the fluffy bun, add a scoop of your homemade coconut ice cream, and top with peanuts or sweet corn.
Chef’s Tip: To enhance presentation, you can drizzle any leftover coconut syrup over the finished sundae for a glossy, appetizing glaze!
Expert Tips & Tricks
-
Use Quality Ingredients: The taste is greatly influenced by your ingredient choices. Opt for high-quality coconut milk and sugar for a richer flavor.
-
Storage Recommendations: If you have leftover ice cream, store it in an airtight container, and make sure to wrap it tightly to prevent air from crystallizing the texture.
-
Make-Ahead: You can prepare the ice cream a week in advance. Just ensure you let it sit at room temperature for 10-15 minutes before serving to soften it for easier scooping.
-
Troubleshooting Troubles: If your ice cream isn’t creamy enough, ensure you’re using full-fat coconut milk, and try adding a little more sugar for sweetness.
-
Avoid Common Mistakes: Don’t rush the chilling process of the ice cream base—it’s crucial for achieving the right texture.
Serving Suggestions
These Thai Coconut Ice Cream Sundaes are best served fresh. Consider pairing them with tropical fruits like mango or pineapple for a flavorful contrast. Presentation is key—use clear parfait glasses to showcase the beautiful layers of rice and ice cream! They are also perfect for summer barbecues, kids’ birthday parties, or simply as a delightful end to your weeknight family dinner.
Variations & Substitutions
- Flavors: Try infusing the ice cream base with different flavors by adding vanilla extract or even espresso for a unique twist.
- Dietary Restrictions: For a dairy-free option, stick with coconut milk, and ensure your sugar is vegan.
- Seasonal Variations: In autumn, add pumpkin puree to the ice cream for a seasonal favorite.
Nutrition & Storage Info
- Prep Time: 4 hours (soaking) + 15 minutes (cooking)
- Cook Time: 25 minutes
- Total Time: 4 hours 40 minutes
- Yield: 4-6 servings
- Estimated calories per serving: Approximately 300-350 (varies with toppings)
Storage Instructions: The ice cream can be stored in the fridge for up to 1 week and in the freezer for up to a month. Sticky rice should be consumed within 2-3 days if kept in an airtight container in the fridge.
FAQ Section
-
Can I use canned coconut milk?
Yes, canned coconut milk is perfect for this recipe! Use whole milk for the best consistency. -
What if I don’t have an ice cream maker?
You can pour the mixture into an airtight container and freeze, stirring every 30 minutes for the first few hours to break up ice crystals. -
Can I make this recipe vegan?
Absolutely! All the ingredients listed here are vegan-friendly. -
How do I know if my sticky rice is cooked?
It should be sticky at the end of cooking time. You can taste it; it should be tender and slightly chewy. -
Can I add other toppings?
Certainly! Fruits like mango, jackfruit, or even a drizzle of chocolate sauce work beautifully. -
What’s the best way to serve the ice cream?
You can serve it in bowls, on top of sticky rice, or even in a fluffy bun for an alternative presentation. -
How do I prevent my ice cream from becoming icy?
Ensure all ingredients are well blended and thoroughly chilled before churning, which helps maintain a creamy texture. -
What’s the difference between regular rice and glutinous rice?
Glutinous rice has a higher starch content, which makes it sticky when cooked, perfect for this dessert. -
Can I use brown sugar instead of palm sugar?
Yes, brown sugar is an excellent alternative, and it adds a lovely caramel flavor. -
How can I enhance the flavor of the coconut?
Adding a splash of vanilla extract or a few drops of coconut extract can intensify the flavor.
Conclusion
This Thai Coconut Ice Cream Sundae isn’t just a dessert; it’s a delightful expression of flavor and tradition that brings back nostalgic memories of summers past. I encourage you to try making this recipe—once you take that first creamy, coconut-infused bite, you’ll understand why it’s a family favorite. Please share your experiences and any variations you try; I’d love to hear your feedback! And don’t forget to check out my other related recipes on the blog; there’s a whole world of deliciousness waiting for you!

Thai Coconut Ice Cream Sundae
Ingredients
Method
- Prepare the Ice Cream Base: In a pot, combine the coconut milk, coconut water, palm sugar, salt, and pandan leaf (if using). Heat over medium heat until it just starts to boil, stirring to dissolve the sugar.
- Cool and Chill: Once boiled, remove from heat and allow it to cool. Chill in the fridge for at least 2 hours or until thoroughly cold.
- Churn: Pour the cooled mixture into your ice cream maker and churn according to the manufacturer’s instructions until it thickens (about 20-25 minutes).
- Freeze: Transfer to an airtight container and freeze for at least 2 hours until firm.
- Pre-soak the Rice: Wash the Thai glutinous rice under cold water until the water runs clear. Soak in enough water to cover for at least 4 hours or overnight for optimal results.
- Steam the Rice: Drain and place the rice in a steamer basket lined with cheesecloth. Steam over boiling water for 20-25 minutes, or until it’s cooked through and sticky.
- Make Coconut Syrup: In a small pot, combine coconut milk, sugar, and salt. Cook on low heat until sugar is dissolved but do not boil. Pour some of this syrup over your cooked rice and let it rest for about 10 minutes.
- Assemble your Sundae: Place a generous scoop of sticky rice in a bowl or the fluffy bun, add a scoop of your homemade coconut ice cream, and top with peanuts or sweet corn.