Stir Fried Turnip Cake in Thai Style: A Flavorful Twist on a Timeless Classic
As someone consumed by a love for food, there’s a special place in my heart for dishes that evoke fond memories and a sense of nostalgia. Stir Fried Turnip Cake in Thai Style is one such dish that transports me back to my childhood, when my family would gather in the kitchen, laughter filling the air as my mom worked her magic with ingredients. Each savory slice, crispy on the outside and tender on the inside, tells a story—a story of shared meals and cherished connections.
What makes these stir-fried turnip cakes truly special is their unique flavor profile. Infused with a delicious medley of sauces and complemented by the crunch of bean sprouts and the freshness of garlic chives, they make a delightful dining experience. What I adore about this recipe is its adaptability; unlike traditional versions, this Thai-inspired style offers a zesty twist that your taste buds will truly appreciate.
In this post, I promise to walk you through the journey of creating your very own stir-fried turnip cake in Thai style, from understanding the ingredients to mastering the technique. Imagine the aroma wafting through your kitchen, enveloping you in comfort as you dazzle your family and friends with a dish that not only tastes incredible but holds sentimental value. Join me, and let’s dive into this flavorful adventure!
What are Stir Fried Turnip Cake in Thai Style?
Traditionally, turnip cake is a beloved dish originating from Cantonese cuisine, often enjoyed during dim sum. These savory cakes, made primarily from grated turnips and rice flour, are typically steamed and then pan-fried to achieve a lovely crispness. However, my favorite twist is the Thai style—where rustic tradition meets vibrant flavor!
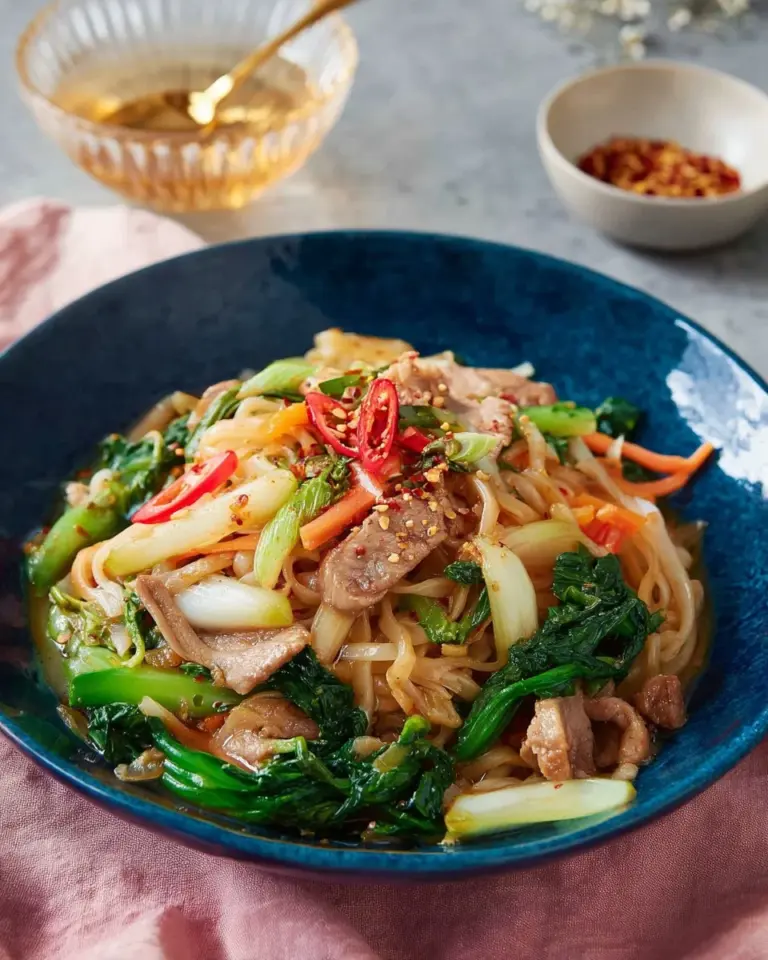
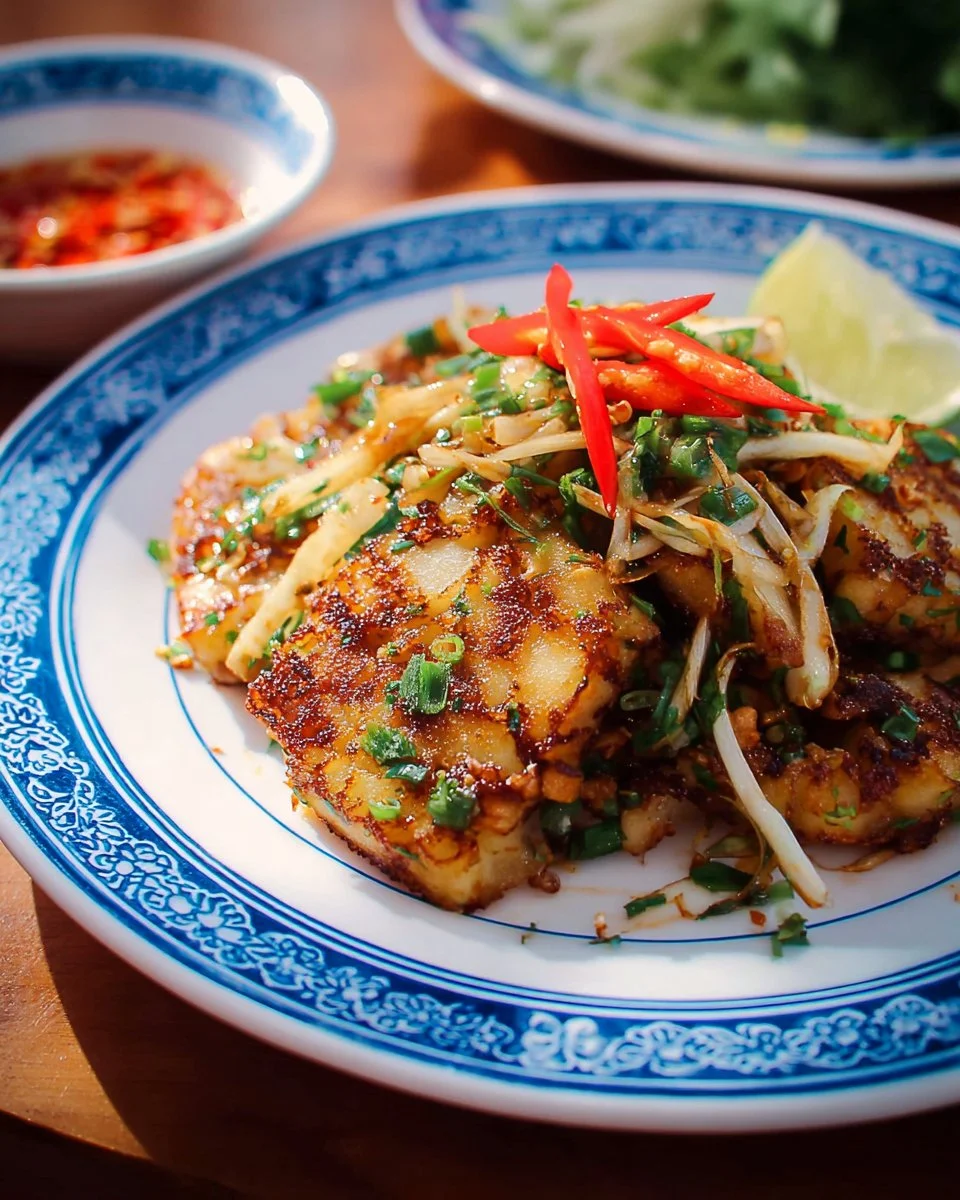
When you take a bite of these turnip cakes stir-fried in a medley of sauces, you’re greeted with a perfect balance of taste and texture. You’ll experience the satisfying crunch of the exterior, while the inside remains delectably soft and savory. The addition of bean sprouts enhances the freshness, while garlic chives lend their unique fragrant touch, quite unlike any other dish you might find at a restaurant.
This dish is perfect for any occasion—whether you’re entertaining guests, wanting a comforting meal for yourself, or simply seeking something new and exciting to try in the kitchen. Trust me, once you taste this Thai-inspired stir-fried turnip cake, you’ll understand why I keep coming back to it!
Why You’ll Love This Recipe
-
Weekend Indulgence: Making your own stir-fried turnip cake at home is both enjoyable and rewarding! Unlike store-bought versions, which can be overly processed, my recipe uses fresh, simple ingredients that allow you to savor every bite.
-
Cost-Effective and Delicious: If you’re on a budget, this recipe works wonders. With just a handful of inexpensive ingredients, you can whip up a flavorful dish that serves multiple people. It’s a great way to impress without breaking the bank!
-
Customizable Flavors: One of the best things about this recipe is its versatility! Feel free to swap out ingredients or mix in your favorites. Want it vegetarian? Add mixed veggies or tofu! Need a bit more heat? Throw in some chili flakes!
-
Quick and Easy Preparation: With a little prep work, you can have this hearty dish ready in about 30 minutes. Whether you’re an experienced cook or someone just dipping their toes into the culinary waters, you’ll find it simple and satisfying.
-
Family-Friendly Fun: Get the little ones involved! The step of cutting the turnip cake into bite-sized pieces can be a fun activity for kids, helping to create family memories around cooking.
Ready to embark on a culinary journey? Let’s bring the vibrant flavors of Thai stir-fried turnip cake into the spotlight of your next meal!

Ingredients Section
To make your delicious Stir Fried Turnip Cake in Thai Style, gather the following ingredients:
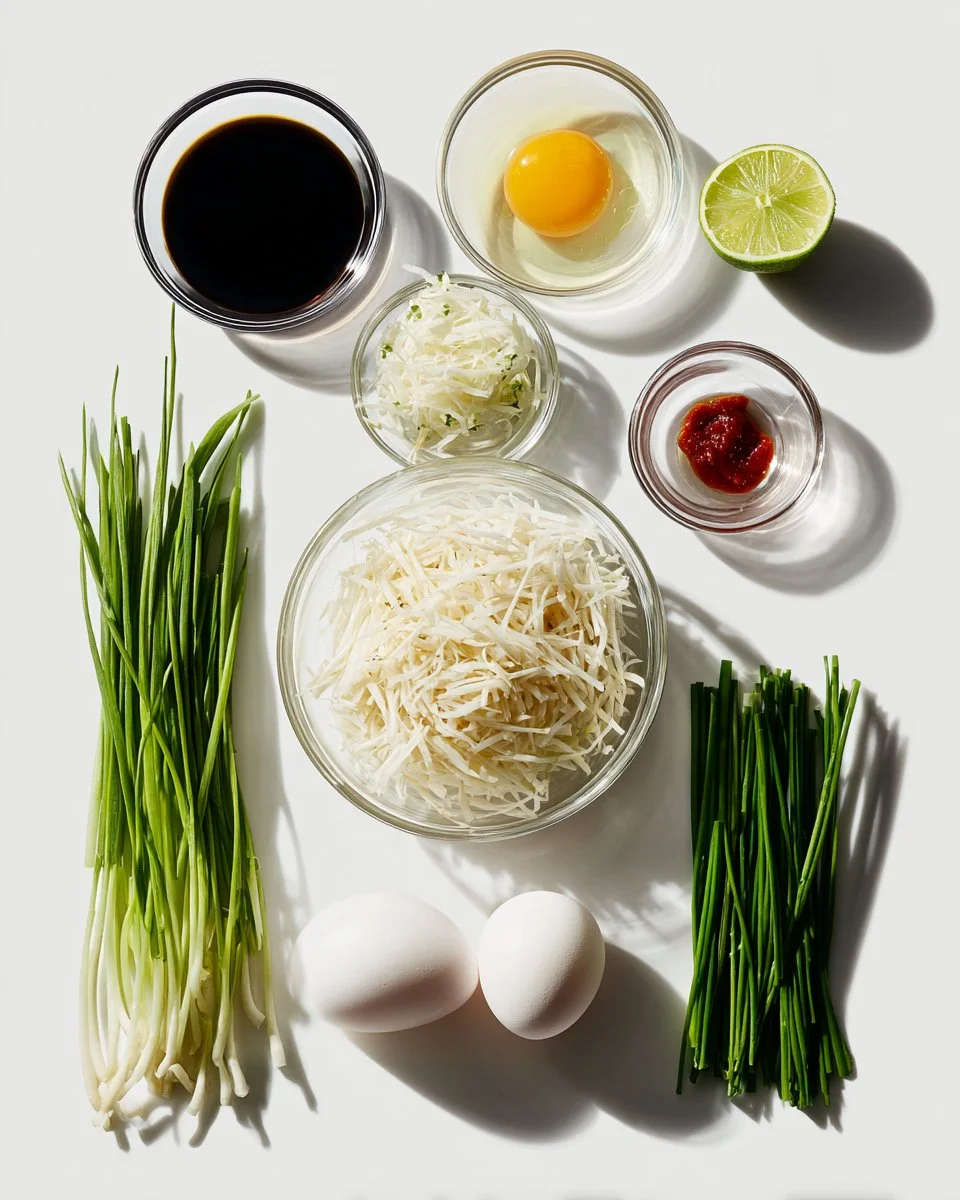
- 12.5 oz turnip cake (lo bak go): This is the star of the dish. For the best flavor, choose freshly made turnip cake from an Asian grocery store or even try making your own if you’re feeling adventurous!
- 2 tablespoons neutral oil: I recommend using canola or peanut oil for high heat cooking.
- 2.5 teaspoons soy sauce: A staple in Asian cooking, enhancing the umami flavor.
- 2 teaspoons sweet soy sauce: This adds a sweet contrast that balances out the saltiness.
- 2 large eggs: These contribute to a velvety smooth texture; you can use organic or free-range eggs for better quality.
- 2 cups bean sprouts: Fresh and crunchy, bringing a refreshing crunch to the dish.
- 6 stems of garlic chives, cut into 2-inch pieces: These are essential for that fragrant, garlicky note.
- Sriracha hot sauce, for serving (optional): A little kick if you like it spicy!
- Lime wedges, for serving: The acidity of lime adds a refreshing kick to the meal.
Ingredient Notes:
- Quality Matters: Fresh turnip cake makes all the difference, so look for quality brands at your local Asian market.
- Substitutions: If you can’t find garlic chives, green onions are a great alternative!
Prep Notes:
- Room Temperature Ingredients: Ensure your eggs are at room temperature to help cook evenly.
Now that we have everything ready, let’s dive into the cooking process!
Step-by-Step Instructions
-
Prepare the Turnip Cake:
- Slice the turnip cake into 3/4 inch thick pieces, then cut each slice into 3/4 inch thick cubes. This size ensures even cooking and browning.
-
Sauce Mixture:
- In a small bowl, combine 2.5 teaspoons soy sauce and 2 teaspoons sweet soy sauce. Give it a good stir to ensure they blend well.
-
Heat That Wok:
- Heat a well-seasoned carbon steel wok or a nonstick pan over medium-high heat. Once hot, add 2 tablespoons neutral oil, allowing it to shimmer.
-
Sear the Turnip Cakes:
- Carefully place the turnip cake cubes in one layer in the pan and let them sear without stirring for about 2-3 minutes until the underside is golden brown.
-
Flip and Brown:
- Flip the pieces to brown the other side for another 2-3 minutes. You want them crispy and golden!
-
Add the Eggs:
- Crack 2 large eggs directly into the pan amongst the turnip cake cubes. Break the yolks gently with your spatula.
-
Elevate the Turnip Cakes:
- Using tongs or chopsticks, position the turnip cake pieces on top of the eggs. Increase the heat to high and let them cook without stirring until the eggs are halfway cooked.
-
Toss It All Together:
- With two spatulas, toss the turnip cakes and eggs together until the eggs are fully cooked and mixed through.
-
Incorporate the Veggies:
- Add 2 cups of bean sprouts and 6 stems of garlic chives, then drizzle the soy mixture over everything. Toss gently for about 30 seconds until the sprouts just wilt.
-
Plate and Serve:
- Remove from heat and plate your delicious stir-fried turnip cake. For an added kick, drizzle some Sriracha on top and serve with fresh lime wedges on the side. Enjoy!
Chef’s Tips:
- Watch the Heat: Cooking on high heat ensures crispness, but keep an eye on it to avoid burning.
- Mistakes to Avoid: Don’t overcrowd the pan, which can lead to steaming rather than searing.
Expert Tips & Tricks
-
Storage Recommendations: Leftover stir-fried turnip cake can be stored in an airtight container in the fridge for up to 3 days. To reheat, simply pan-fry again for a bit of crispness!
-
Make-Ahead Instructions: You can prepare the turnip cake cubes ahead of time. Just refrigerate them until you’re ready to fry.
-
Common Problems: If your turnip cake is falling apart while frying, it may be a sign that it wasn’t pressed enough when making or the cooking temperature is too low.
-
Crispier Texture: For an extra crispy exterior, let your turnip cake pieces sit in the pan without stirring for a little longer.
-
Utilize Leftovers Creatively: Try using leftover turnip cake pieces in a fried rice dish or even in a stir-fry with your choice of proteins and veggies!
-
Experiment with Add-ins: If you’re feeling adventurous, try adding other proteins such as shrimp or chicken for an even heartier dish!
Serving Suggestions
These stir-fried turnip cakes make a fantastic dish on their own but can also be paired beautifully with a side of steamed vegetables or a light soup. To elevate the presentation, consider garnishing with chopped cilantro or julienned carrots. Perfect for casual gatherings or even special occasions—these crispy delights will surely be the highlight of the meal!
Variations & Substitutions
- Flavors Unleashed: Want a kick? Try adding Thai red curry paste to the sauce mixture for a spicy twist!
- Dietary Adaptations: For a vegetarian version, skip the eggs and add mushrooms or tofu instead.
- Seasonal Fun: In the fall, try incorporating roasted pumpkin or squash for a unique take on this classic dish.
Nutrition & Storage Info
- Prep Time: 10 minutes
- Cook Time: 20 minutes
- Total Time: 30 minutes
- Yield: 4 servings
- Estimated Calories: About 200 calories per serving
Storage Instructions
- Room Temp: Not recommended for long periods.
- Refrigerator: Store in an airtight container for up to 3 days. Reheat in a pan to regain crispiness.
- Freezer: You can freeze before frying, tightly wrapped. Thaw before cooking.
FAQ Section
-
Where can I find turnip cake?
- You can usually find turnip cake at an Asian grocery store or make it at home with grated turnips and rice flour.
-
Can I use different vegetables?
- Absolutely! Bell peppers or snap peas would add a wonderful crunch.
-
Is this dish gluten-free?
- To make it gluten-free, look for gluten-free soy sauce and ensure the turnip cake is made with gluten-free rice flour.
-
What if I don’t have a wok?
- A non-stick pan works perfectly! Just ensure it’s large enough to fit all the ingredients without overcrowding.
-
Can I replace the beansprouts?
- Yes, you can substitute with any crunchy vegetable like shredded cabbage or water chestnuts.
-
How can I make this dish spicier?
- Incorporate diced chili peppers or drizzle with more Sriracha!
-
Can I make this dish vegan?
- Replace eggs with scrambled tofu or omit altogether for a vegan option.
-
What’s the difference between sweet soy sauce and regular soy sauce?
- Sweet soy sauce, or kecap manis, is thicker and sweetened with sugar, adding a deliciously sweet and savory depth to dishes.
-
Can these cakes be made ahead of time?
- Yes! You can prepare and fry the turnip cakes ahead of time and simply reheat before serving.
-
How do I know the turnip cakes are fully cooked?
- The cakes should be golden brown and crispy on the outside, while the inside remains tender.

Conclusion
So there you have it! This Stir Fried Turnip Cake in Thai Style is more than just a recipe; it’s a passport to flavor and nostalgia. Whether you’re creating it as your next family meal or serving it at a party, I guarantee it will be a hit. I’m eager for you to try your hand at this dish and witness the joy it brings to your kitchen. Share your feedback, tell me about your experience cooking it, and don’t forget to check out my other delicious recipes on the blog for more culinary inspiration! Happy cooking!

Stir Fried Turnip Cake in Thai Style
Ingredients
Method
- Slice the turnip cake into 3/4 inch thick pieces, then cut each slice into 3/4 inch thick cubes.
- In a small bowl, combine 2.5 teaspoons soy sauce and 2 teaspoons sweet soy sauce. Stir to blend.
- Heat a well-seasoned carbon steel wok or a nonstick pan over medium-high heat. Add 2 tablespoons neutral oil.
- Carefully add the turnip cake cubes in one layer and let them sear without stirring for about 2-3 minutes.
- Flip the turnip cake pieces to brown the other side for another 2-3 minutes.
- Crack 2 large eggs directly into the pan among the cubes, gently break the yolks.
- Position the turnip cake pieces on top of the eggs and increase heat, cooking until the eggs are halfway cooked.
- Use two spatulas to toss together until the eggs are fully cooked.
- Add 2 cups of bean sprouts and 6 stems of garlic chives, then drizzle the soy mixture over everything and toss gently for about 30 seconds.
- Remove from heat, plate your stir-fried turnip cake, drizzle with Sriracha, and serve with lime wedges.