
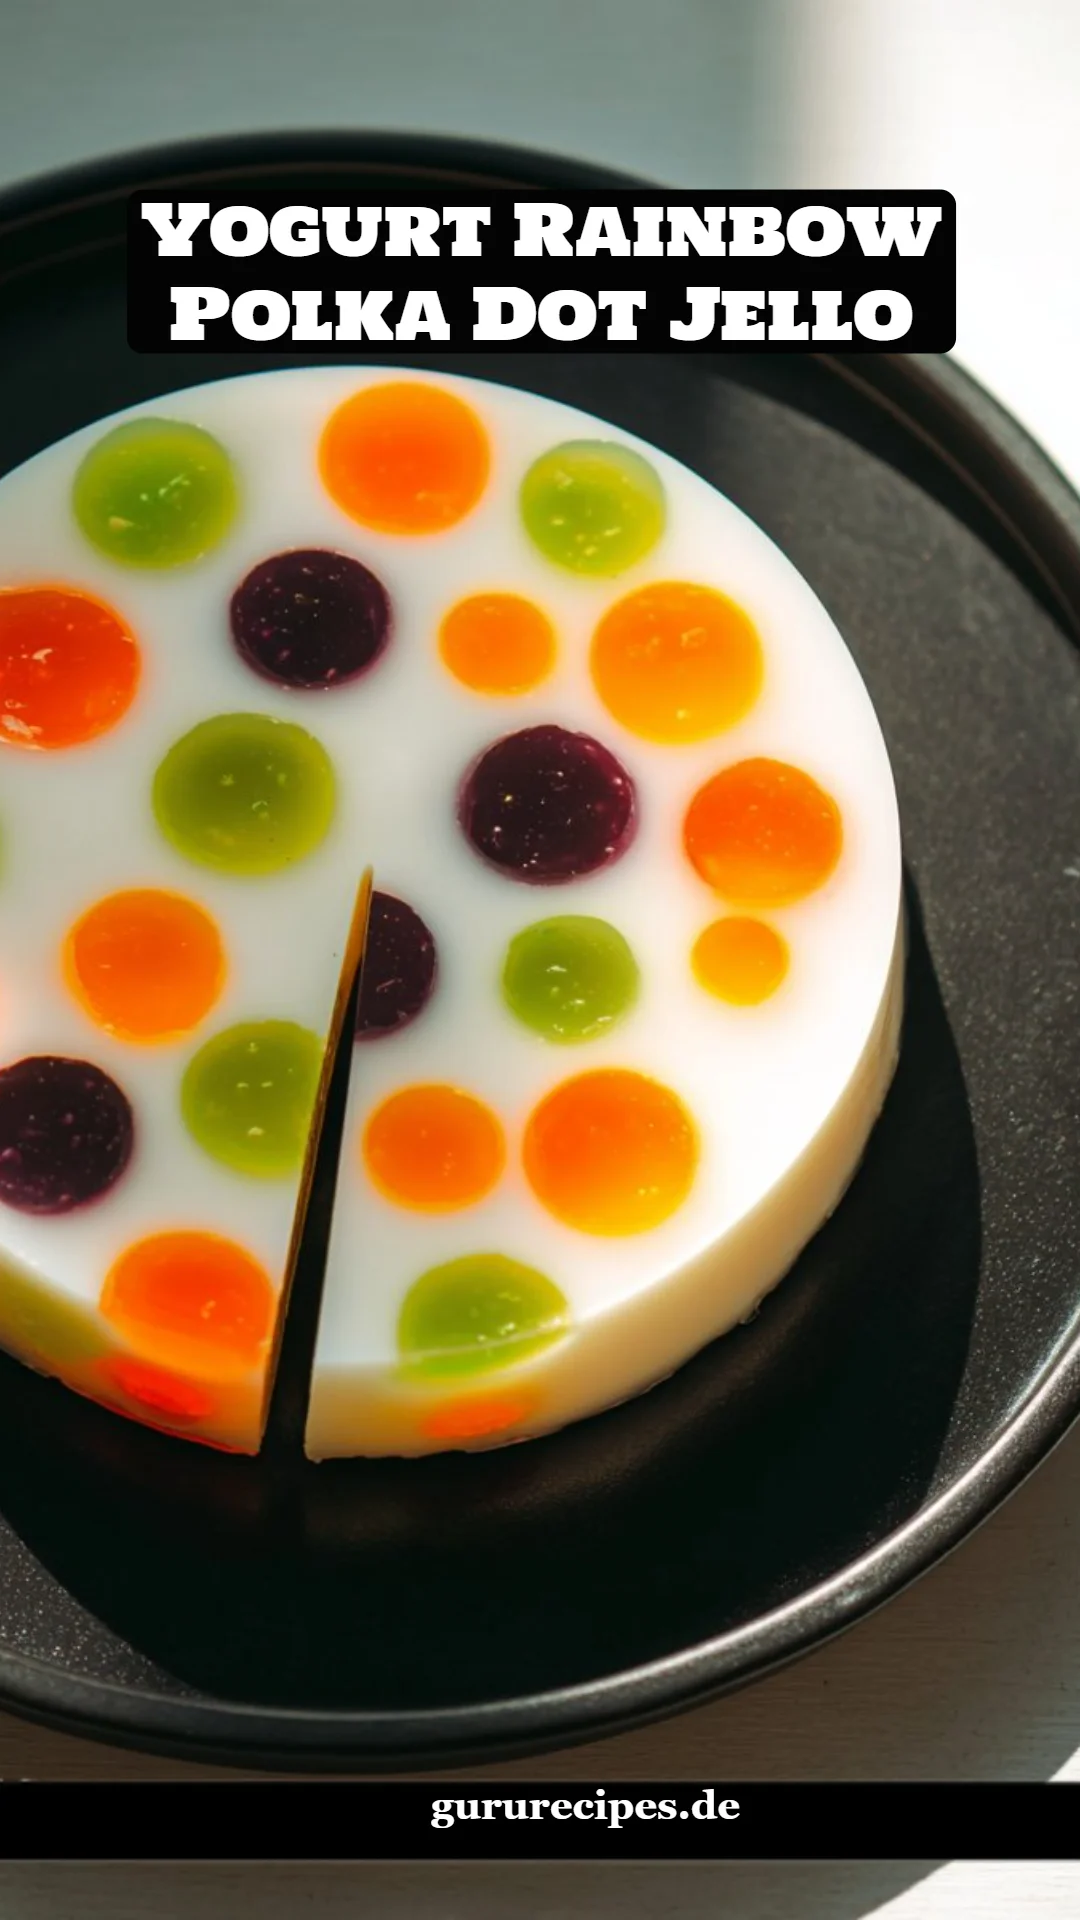
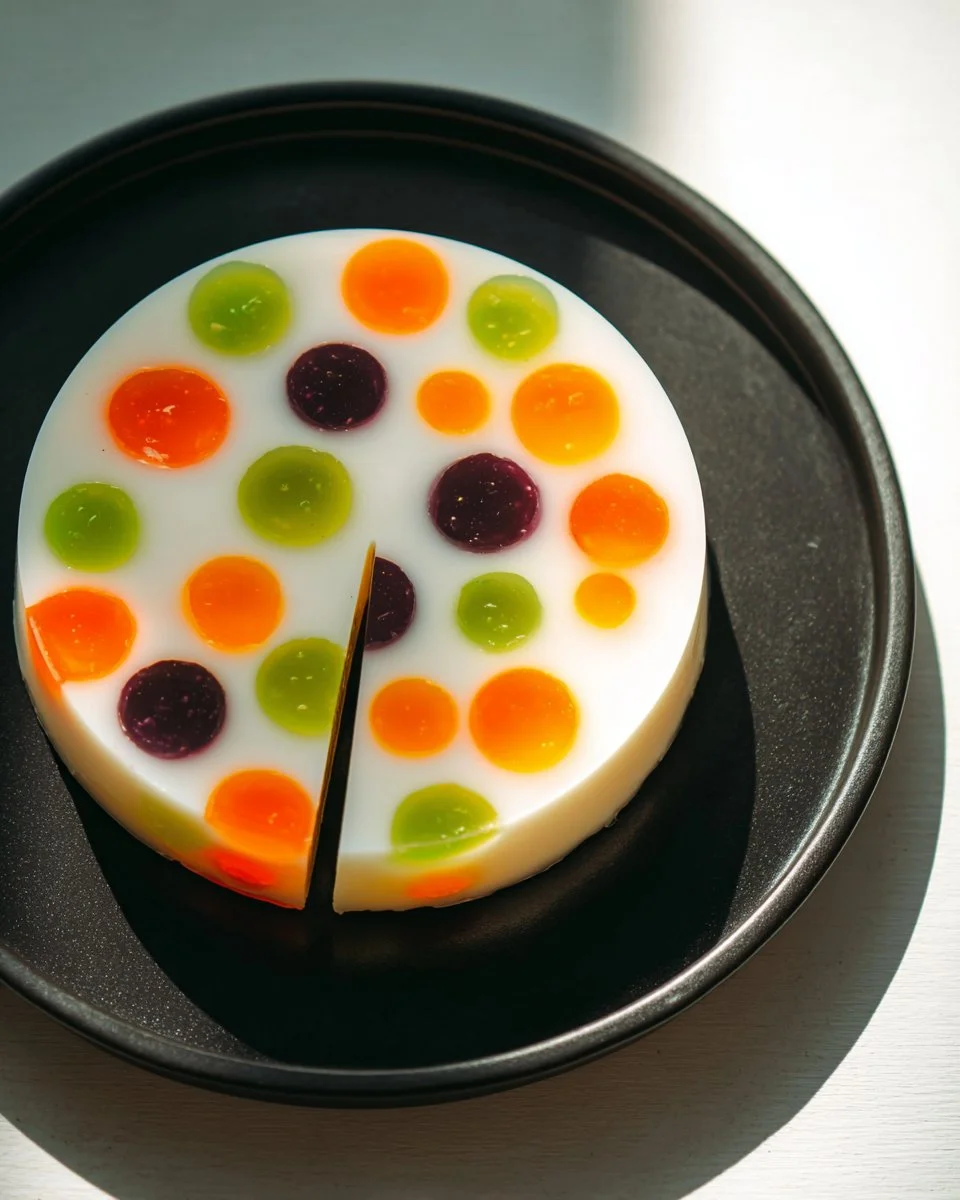
Rainbow Delight: A Festive Yogurt Polka Dot Jello Recipe You’ll Adore
As a child, there was nothing more magical than dessert time at Grandma’s house—especially when she presented her dazzling Rainbow Polka Dot Jello. Bright, colorful, and absolutely irresistible, it made every family gathering feel like an occasion. Today, I want to recreate that nostalgic feel with my own twist on this childhood classic: Yogurt Rainbow Polka Dot Jello.
What makes this version so special? Unlike traditional jello, which can sometimes feel overly sugary or artificial, this version embraces the creamy delight of yogurt, providing not just sweetness but also a satisfying tang. The combination of yogurt and vibrant, playful jelly dots creates a textural experience that dances on your palate. Trust me, it’s a treat that will take you back to those cherished family moments while impressing your friends and family.
In this post, you’ll learn how to create this delightful dessert step by step, along with some tips to customize it for any occasion. So gather around, and let’s dive into making yogurt magic together!
What Are Yogurt Rainbow Polka Dot Jello?
Yogurt Rainbow Polka Dot Jello is a joyful fusion of creamy yogurt and fruity jelly. While traditional jello is primarily made from gelatin, this recipe infuses a wholesome yogurt drink—which gives it a rich, tangy flavor. Making this dessert isn’t just about assembling layers; it’s an art form, each jelly cone slice cozying up to a luscious yogurt layer, providing delightful surprises with every bite.
This treat is uniquely versatile, making it perfect for birthdays, family picnics, or holiday celebrations. Anytime you want to add a splash of color and fun to your dessert table, this creation will surely be the showstopper. Not only does it look stunning, but it also puts a healthier twist on a classic favorite, ensuring that you can indulge without guilt.
Why You’ll Love This Recipe
-
Nostalgic Appeal: If you loved jello as a kid, this updated version takes you back to those exciting dessert moments—but with a healthier spin.
-
Better Than Store-Bought: Unlike many store-bought jellos packed with preservatives and artificial flavors, this recipe features wholesome ingredients without compromising on flavor. Plus, it’s fresher!
-
Cost-Effective: Creating your own dessert is not only cheaper compared to restaurant versions but also allows you to know exactly what’s in it.
-
Fully Customizable: Change up flavors by choosing different yogurt and jelly combinations! Want a tangy raspberry yogurt with lemon jello? Go for it!
-
Simplicity Meets Elegance: While it looks fancy and takes center stage at any gathering, this recipe requires minimal cooking and a short list of ingredients.
This recipe is low in effort yet high in satisfaction, making it a win-win for both you and your guests!
Ingredients Section
- 4 cups yogurt drink: I recommend using a good-quality Greek yogurt drink for a richer flavor—look for options that have no added sugars. If you’re vegan, opt for coconut or almond-based yogurt drinks!
- 1 1/2 tablespoons agar-agar powder: This natural thickener from seaweed is a perfect alternative to gelatin and provides a beautiful, firm texture.
- 4 jelly cones: Choose vibrant flavors that you adore. My personal favorites are strawberry, orange, and blueberry, as they bring such a delightful burst of color!
Prep Notes
- Use room temperature ingredients where indicated to ensure even mixing.

Step-by-Step Instructions
-
Prepare the Agar: Pour the yogurt drink into a medium-sized pot. Sprinkle the agar-agar powder over the top. Stir constantly for a few minutes until everything is well combined. Let it sit for 10 minutes to allow the powder to soften.
-
Slice the Jelly: While your mixture rests, slice the jelly cones into round pieces. These will create the fun “polka dots” throughout your jello!
-
Heat the Mixture: Set the pot containing your yogurt drink and agar-agar over medium heat. Bring to a gentle boil, stirring constantly, until the agar-agar is fully dissolved—this usually takes 5-7 minutes. Be cautious not to let it boil too hard to avoid boiling over.
-
Cool Down: Remove from heat and allow the mixture to cool for a few minutes.
-
Layer the Jelly: Arrange your sliced jelly cones at the bottom of your chosen bowl or mold.
-
Combine: Slowly pour the cooled agar mixture over the jelly slices, using the back of a spoon to keep them in place. This technique helps them remain at the bottom, creating those gorgeous dotted layers.
-
Let It Set: Cover with plastic wrap and place in the fridge. Allow it to set for 20-30 minutes or until firm.
-
Unmold and Serve: Once set, gently use a silicone spatula around the edges of the bowl and flip it onto a serving dish. Slice into pieces and garnish with extra jelly pieces for an attractive finish. If you’d like to serve it cold, let it chill a little longer before serving.
Chef’s Tips
- Don’t Rush the Cooling: This step is crucial; if the agar is too hot, it can collapse the jelly pieces.
- Experiment with Textures: Try mixing in some finely chopped fresh fruits for added texture!
Expert Tips & Tricks
-
Storage: Yogurt Rainbow Polka Dot Jello can be stored in an airtight container in the fridge for up to 3 days. It’s best served fresh but will hold up wonderfully for a few days.
-
Make-Ahead: Prep this dessert the day before your event for a stress-free day-of. It allows the flavors to meld beautifully!
-
Troubleshooting: If you find the agar isn’t setting, it may not have dissolved properly during heating. Make sure to stir continuously!
-
Cutting: For clean cuts, use a hot knife. Just dip it in boiling water, wipe, and slice!
-
Flavor Variations: I’ve tried this with mango yogurt and lime jello, which was a huge hit during summer picnics!
-
Balanced sweetness: Taste your yogurt drink and adjust the sweetness in your jelly if using unsweetened yogurt.
Serving Suggestions
This colorful delight pairs beautifully with fresh fruits like berries or a dollop of whipped cream. For a more decadent touch, serve it alongside a scoop of vanilla ice cream. It’s a dazzling centerpiece for birthdays, potlucks, or any festive gathering—just perfect to celebrate life’s sweet moments!
Variations & Substitutions
- Flavor Combinations: Try mixing raspberry yogurt with lemon jelly or coconut yogurt with pineapple jelly for a tropical twist.
- Dietary Adaptations: For a low-sugar version, use unsweetened yogurt and sugar-free jello. Dairy-free options are just as delicious with plant-based yogurt.
- Seasonal Variations: In fall, pumpkin yogurt and ginger jelly would create a festive holiday treat!
Nutrition & Storage Info
- Prep Time: 10 minutes
- Cook Time: 15 minutes
- Total Time: 45 minutes (including setting)
- Yield: Serves 8
- Estimated Calories: Approximately 120 calories per serving.
- Storage Instructions: Store in the refrigerator, airtight for up to 3 days.
FAQ Section
1. Is agar-agar the same as gelatin?
While both are used as thickeners, agar-agar is plant-based (from seaweed), making it perfect for vegetarian and vegan diets.
2. Can I use regular yogurt?
Yes! Any yogurt you prefer will work, but for a richer texture, I recommend a Greek yogurt drink.
3. How do I know when the agar is dissolved?
It should be completely clear without any granules. It typically takes about 5-7 minutes of gentle boiling.
4. Why isn’t my jello setting?
It may be due to insufficient heat when dissolving the agar or if the mixture was too hot when you poured it. Make sure to follow the steps closely!
5. What if I want to make a sugar-free version?
You can use unsweetened yogurt and sugar-free jello options for a lighter version without compromising taste.
6. Can I use flavored yogurt?
Absolutely! Flavored yogurt will only enhance the flavor profile of your final product.
7. How long does it take to set?
Typically, it takes about 20-30 minutes in the fridge, but you can leave it longer if needed—just cover it well!
8. Can I use this recipe for layered desserts?
Definitely! Just increase the set time between layers to ensure each layer stands independently.
9. Is it safe to eat if it sits out?
If kept at room temperature for more than 2 hours, it’s best to discard it due to the dairy content.
10. What dishes can I use for this dessert?
Any bowl or mold works well! For a more formal presentation, use a ring mold.
Conclusion
Yogurt Rainbow Polka Dot Jello is more than just a dessert; it’s a journey through sweet childhood memories combined with a fun, fresh reimagining. I encourage you to try it out at your next gathering and see what a hit it can be! Your family and friends will thank you for bringing this playful and delicious treat into their lives.
Have you made this delightful dessert? I would love to hear your thoughts and any variations you’ve tried! For more delightful recipes like this one, check out my other blog posts—happy baking!

Yogurt Rainbow Polka Dot Jello
Ingredients
Method
- Pour the yogurt drink into a medium-sized pot. Sprinkle the agar-agar powder over the top and stir constantly for a few minutes until well combined. Let it sit for 10 minutes to soften.
- Slice the jelly cones into round pieces to create the polka dots.
- Set the pot over medium heat and bring to a gentle boil, stirring constantly until the agar-agar is fully dissolved (5-7 minutes).
- Remove from heat and allow to cool for a few minutes.
- Arrange sliced jelly cones at the bottom of your chosen bowl or mold.
- Slowly pour the cooled agar mixture over the jelly slices, using a spoon to keep them in place.
- Cover with plastic wrap and place in the fridge to set for 20-30 minutes.
- Once set, gently use a silicone spatula around the edges and flip onto a serving dish. Slice into pieces and garnish with extra jelly pieces.