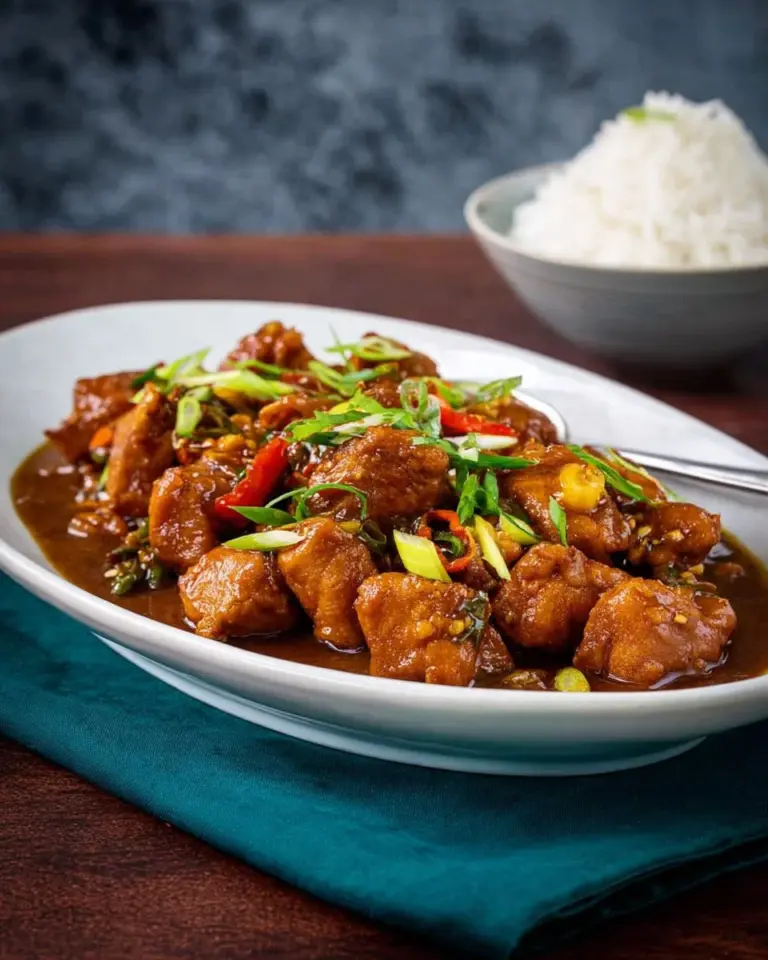
Irresistible Thai Basil Stir Fry Sauce: A Flavorful Adventure Awaits!
Picture this: it’s a warm summer evening, and the aromas of garlic, onion, and vibrant herbs fill the air from my kitchen window. This isn’t just any cooking session; it’s a cherished family tradition passed down through generations. Growing up, there was always a special dish that made every meal feel like a celebration—a zingy, aromatic stir fry enhanced with homemade Thai Basil Stir Fry Sauce. The moment you take a bite, that familiar burst of flavor transports you back to family dinners, laughter, and endless stories shared over the table.
What makes my version of Thai Basil Stir Fry Sauce special? It strikes that perfect balance of savory, sweet, and aromatic, setting it apart from store-bought versions or even other recipes. With fresh ingredients and a few tweaks, this sauce enhances your stir-fry into a comforting masterpiece that brings everyone together.
In this post, I’ll share not just this delightful recipe but also the soul behind it and tips to help you create the perfect dish that’ll become your new go-to. Trust me; you don’t want to miss this flavor journey!
What Are Thai Basil Stir Fry Sauces?
Originating from Southeast Asia, particularly Thailand, Thai Basil Stir Fry Sauce is the embodiment of umami. This sauce is a magical blend where earthy and aromatic Thai basil meets the robust flavors of oyster and soy sauce. The rich, savory taste mingles beautifully with fresh ingredients, offering a unique flair that’s simply hard to resist.
While Thai basil itself has a slightly peppery and minty flavor, when combined with other ingredients, it creates a complex sauce that adds depth and balances the heartiness of your stir-fried dishes. Why should you make this sauce? Because it elevates everyday meals into something extraordinary! Whether stir-frying vegetables or meat, it brings a delicious kick that transforms your fare from mundane to magnificent.
Why You’ll Love This Recipe
-
Authentic Flavor: Unlike many store-bought sauces that can be filled with preservatives, this homemade Thai Basil Stir Fry Sauce harnesses the vibrant flavors of fresh ingredients. With every bite, you’ll savor the authenticity and complexity that only a homemade sauce can offer.
-
Cost-Effective: Economically, this sauce is a winner! You can create a large batch for a fraction of the cost of restaurant or store-bought versions, saving your wallet for future culinary adventures.
-
Customizable: This recipe is sturdy yet flexible! You can easily swap proteins, such as chicken, pork, or tofu, and adjust spice levels to fit your taste. Want it spicier? Toss in extra chilies; in the mood for something a little sweet? Add honey or more sugar!
-
Quick & Easy: With prep and cooking time totaling under 30 minutes, this recipe is simple enough for weeknight dinners but impressive enough to serve guests.
-
Memorable Comfort Food: This sauce is not just about flavor; it’s about connection. Each time you make it, you’re not just preparing a meal; you’re inviting nostalgia and warmth back into your kitchen, creating new memories with each bite.
Ingredients
For the best results, I highly recommend opting for high-quality ingredients. Here’s what you’ll need:
- 2 tablespoons oyster sauce: Brands like Lee Kum Kee or Kikkoman offer great flavor.
- 1 tablespoon soy sauce: Go for a naturally brewed soy sauce for depth.
- 2 teaspoons fish sauce: Use Tiparos for a balanced flavor.
- 2 teaspoons granulated sugar: Enhances the sauce’s sweetness and balances the saltiness.
- 2 tablespoons neutral oil: Canola or grapeseed oil are great choices for frying without flavor interference.
- 1/2 an onion, julienned: Sweet onions work wonderfully here.
- 6 cloves garlic, chopped: Fresh garlic enhances aroma and taste.
- 1-2 Thai chilies, chopped (optional): Adjust based on your heat tolerance.
- 1 cup unsalted chicken, pork, or vegetable stock: Homemade is best, but store-bought works in a pinch.
- Ground white or black pepper, to taste: Freshly ground is always a winner!
- 1/2 teaspoon black or dark soy sauce (optional): Adds depth and color.
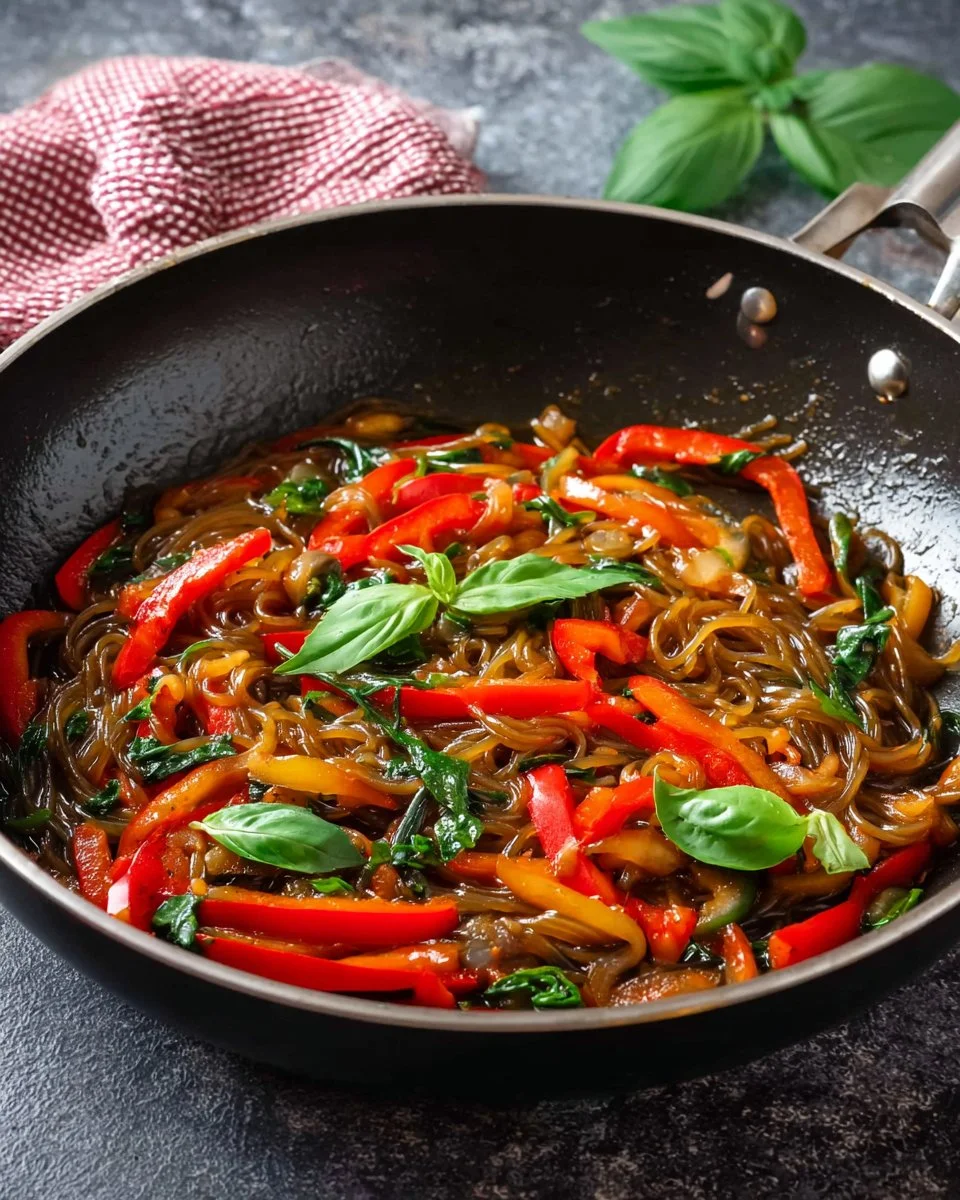
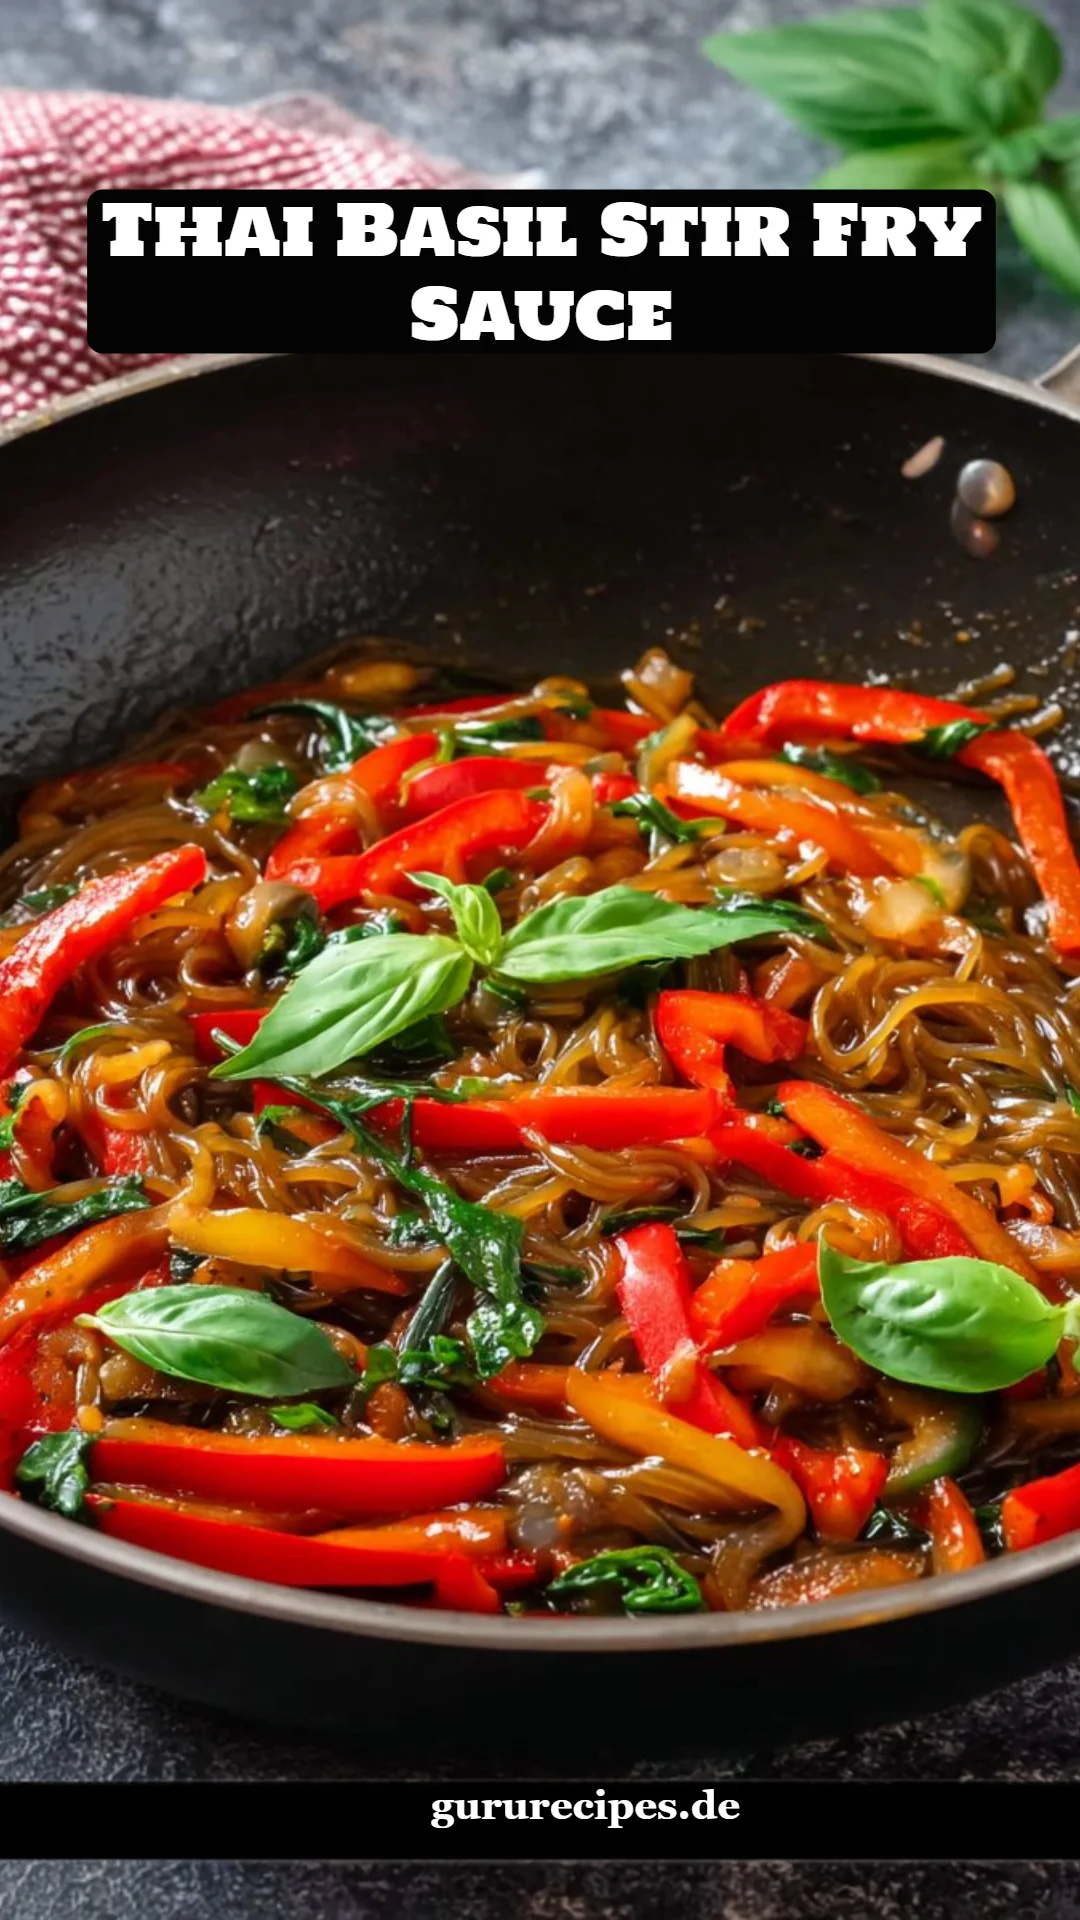
- 1/2 cup julienned red bell pepper: For color and crunch.
- 1 1/2 cups basil leaves: Fresh Thai basil is ideal, bringing that fragrant quality.
Preparation Notes
- Gather all ingredients at room temperature for smooth integration, especially the butter.
- Rinse and dry the basil to keep it fresh without water residue.
Step-by-Step Instructions
-
Combine the Sauces: In a bowl, whisk together oyster sauce, soy sauce, fish sauce, and sugar. This blend forms the base flavor of your stir fry.
-
Sauté the Aromatics: Heat neutral oil in a wok or large pan over medium heat. Add the julienned onions and sauté for about 3-4 minutes, or until they turn translucent and fragrant.
-
Add Garlic and Chilies: Toss in the chopped garlic and Thai chilies, stirring continuously. Be careful not to burn the garlic! This should take about 1-2 minutes until it starts to brown.
-
Incorporate the Stock and Sauce: Pour in your chicken stock along with your prepared sauce mixture and season with ground pepper. Stir everything to combine, letting it simmer for 2-3 minutes.
-
Add the Vegetables: Gently fold in the julienned red bell pepper, cooking for an additional minute to soften them slightly.
-
Stir in the Basil: Finish by adding the basil leaves and toss until they start to wilt—this should take about 30 seconds. Taste and adjust the sauce with more stock or saltiness as needed.
-
Serve: Use immediately for stir-frying or let it cool before storing in the fridge for up to a week.
Chef’s Tips
- Watch closely during sautéing; burnt garlic can ruin the flavor.
- Experiment with extra vegetables like bok choy or snap peas for added texture.
- Always taste your sauce before serving to adjust flavors as needed.
Expert Tips & Tricks
-
Storage: Keep any leftover sauce in an airtight container in the fridge for up to one week. It also freezes well for 2 months—just thaw and reheat!
-
Make-ahead: Preparing this sauce the day before can enhance the flavor as it allows the ingredients to mingle overnight.
-
Common Problems: If your sauce appears too salty, dilute it with extra stock or water until balanced.
-
Consistency: For a thicker sauce, add a cornstarch slurry toward the end to thicken it up.
-
Flavor Enhancements: A dash of sesame oil can add another layer of flavor if you love that nutty taste.
Serving Suggestions
Serve this delightful stir fry alongside fragrant jasmine rice or noodles for a complete meal! To add flair, garnish with fresh lime wedges and additional basil leaves. Perfect for cozy family dinners or entertaining friends, this dish impresses with vibrant colors and enticing aromas. Elevate your dining experience by setting the table with chopsticks and colorful plates for a fun, authentic touch!
Variations & Substitutions
- Proteins: Swap out chicken for shrimp, beef, or even tempeh for a vegetarian option.
- Fruits: Toss in pineapple or mango for a sweet twist and vibrant color.
- Herbs: If you can’t find Thai basil, you can substitute with regular basil or mint for a different yet enjoyable flavor.
Nutrition & Storage Info
- Prep Time: 10 minutes
- Cook Time: 15 minutes
- Total Time: 25 minutes
- Yield: 4 servings
- Estimated Calories per Serving: 120 calories
- Storage Instructions: Keep in the fridge for up to one week, or freeze for up to two months. Thaw in the refrigerator overnight before use.
FAQ Section
-
Can I use dried basil instead of fresh?
- While fresh basil is recommended for maximum flavor, if you must use dried, halve the quantity since it’s more concentrated.
-
What do I do if the sauce is too runny?
- You can thicken the sauce by adding a cornstarch slurry (1 tablespoon cornstarch mixed with 2 tablespoons water) and simmering until it reaches your desired consistency.
-
Can I make this sauce vegan?
- Absolutely! Just replace oyster sauce with mushroom-based oyster sauce or soy sauce and use vegetable stock.
-
Is it safe to freeze this sauce?
- Yes! Store it in an airtight container, and it will last up to two months in the freezer.
-
How do I make it gluten-free?
- Use gluten-free soy sauce and ensure your other sauces are verified gluten-free.
-
What should I serve it with?
- This sauce pairs beautifully with rice, noodles, or grilled meats and vegetables.
-
Can I add other vegetables?
- Feel free to get creative! Broccoli, snap peas, or carrots add freshness and crunch.
-
What’s the difference between Thai basil and sweet basil?
- Thai basil has a spicier, more aromatic flavor compared to the sweeter, milder taste of sweet basil.
-
Can I use this sauce for marinades?
- Yes! It works wonderfully as a marinade for meats and vegetables before grilling or roasting.
-
How can I adjust the spiciness?
- Simply reduce the amount of Thai chilies or omit them entirely if you prefer a milder sauce.

Conclusion
This Thai Basil Stir Fry Sauce isn’t just a condiment—it’s a gateway to a world of flavors and memories. Simple yet sophisticated, it has the power to bring comfort and creativity into your kitchens. I urge you to try this recipe, and I promise it will become a beloved staple in your household. After you’ve given it a go, I’d love to hear how it turned out for you! Don’t hesitate to leave your feedback and share your experiences. And if you’re looking for more delightful recipes, be sure to check out my other culinary creations on the blog!

Thai Basil Stir Fry Sauce
Ingredients
Method
- Gather all ingredients at room temperature for smooth integration.
- Rinse and dry the basil to keep it fresh without water residue.
- In a bowl, whisk together oyster sauce, soy sauce, fish sauce, and sugar to form the base flavor.
- Heat neutral oil in a wok or large pan over medium heat. Add the julienned onions and sauté for 3-4 minutes until they are translucent.
- Add chopped garlic and Thai chilies, stirring continuously for 1-2 minutes until the garlic starts to brown.
- Pour in your stock along with the sauce mixture and season with ground pepper. Stir to combine and let it simmer for 2-3 minutes.
- Fold in the julienned red bell pepper and cook for an additional minute.
- Add basil leaves and toss until they start to wilt for about 30 seconds. Adjust sauce with more stock or saltiness as needed.
- Use immediately for stir-frying or let it cool before storing.